...
| Note |
|---|
The features and methods in this guide, while tested by us, are still considered BETA. Contact support@packagecloud.io with any questions or issues you might have during this process. |
| Warning |
|---|
Before continuing, ensure that you have packagecloud:enterprise version 2.0.2-1 or above, previous versions do not support migration. |
| Table of Contents | ||
|---|---|---|
|
Overview
This guide will walk you through the process of migrating your packagecloud:enterprise deployment from the embedded MySQL to an Aurora database hosted on Amazon RDS using Amazon Database Migration Service with minimal downtime.
Terminology
We'll be consistently using the same terminology throughout this guide.
| Term | Definition |
|---|---|
| Replication Instance | The instance provisioned by Amazon Database Migration Service |
| Source Instance | Your packagecloud:enterprise install |
Target Instance | The newly created RDS instance we'll be moving to |
| DMS | Amazon Database Migration Service |
| RDS | Amazon Relational Database Service |
Workflow
The high-level workflow for this migration can be summarized to the following steps:
- Create target instance on RDS
- Securely expose source instance MySQL to DMS
- Use DMS to transfer all data and replicate any ongoing changes to target instance
- Monitor migration progress
- Switch configuration to use target instance on RDS when migration is complete
- Cleanup
Security
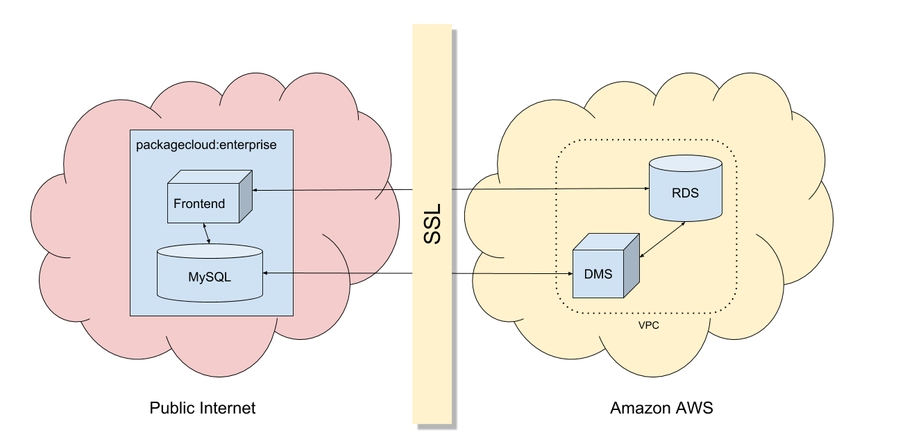
As you can see in the topology diagram below, all communications in and out of AWS from packagecloud:enterprise is encrypted using industry standard, 128-bit SSL. Furthermore, the highest level of SSL verification is used to prevent "Man-in-the-middle" attacks, to be specific:
- packagecloud:enterprise verifies the Server Name (VERIFY_IDENTITY) on the SSL certificate the RDS server presents and also verifies its signature was signed by Amazon's trusted Certificate Authority.
- A unique certificate is securely generated upon installing packagecloud:enterprise and uploaded to Amazon DMS Certificate Manager to verify communication to the source instance (VERIFY_CA).
- The DMS replication instance communicates to RDS within the same Amazon VPC, so SSL is not used nor needed here.
In addition to mutual SSL verification, this guide sets up firewall rules and security groups to ensure that only your frontend and DMS can access RDS and that only DMS can access your source instance.
Detailed Walkthrough
Create target instance on RDS
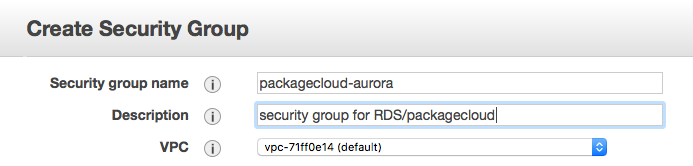
Create Security Group
Note This is located under the EC2 section of your AWS dashboard
- Save security group, then modify it.
- Add the following rules. For example, our Source Instance has the IP of 1.2.3.4, so we'll write 1.2.3.4/32 (Amazon wants the full CIDR notation). We'll also add the security group itself to allow any other instance sharing this security group access to port 3306.
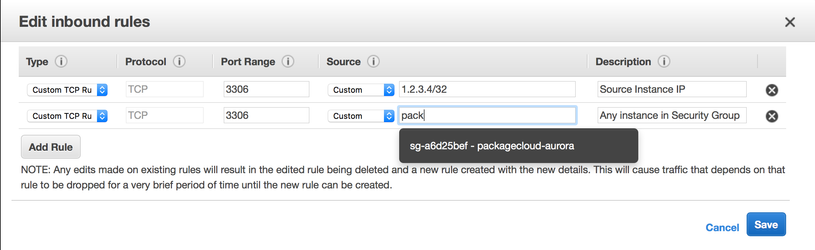
This will allow our Source Instance and Replication Instance to communicate with our Target Instance. - Follow the steps on our Amazon RDS page to create a DB cluster Parameter group that ensures UTF-8.
- Launch a new RDS instance with our DB cluster parameter group and security group.
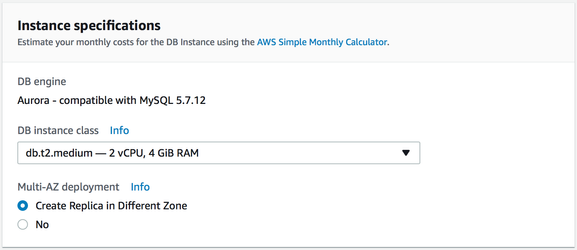
Give it a master username of 'aws' with a long, preferably randomly generated password.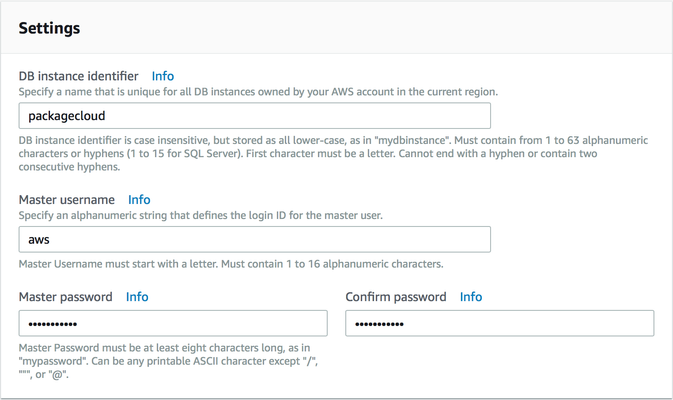
Make sure Public Accessibility is set to 'Yes' unless your packagecloud:enterprise deployment is in the same VPC as your RDS instance. Also make sure to choose the security group we created earlier and remove the 'default' security group.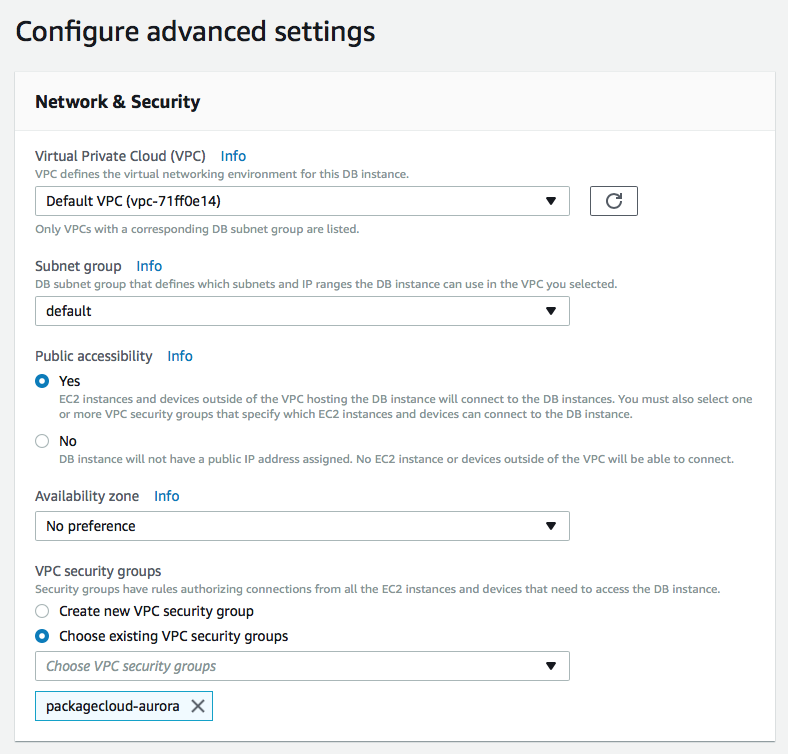
You can leave DB Cluster identifier and Database Name blank, as we'll create the database ourselves shortly. Make sure to choose the UTF8 DB cluster parameter group you created earlier.
You can enable automatic Encryption using Amazon KMS.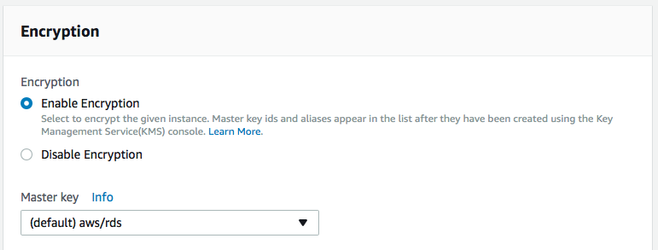
Customize your Failover, Backup, and Monitoring Settings. We recommend daily backups and enhanced monitoring.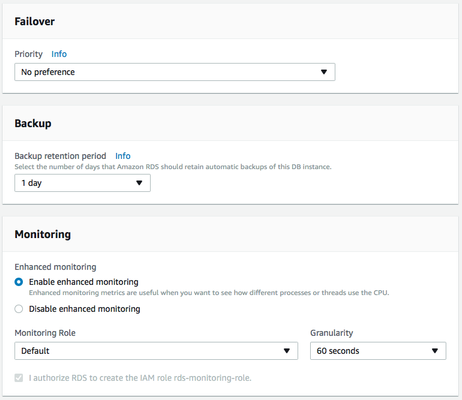
Lastly, you can customize your Maintenance window in which RDS can perform minor version upgrades (or disable them completely).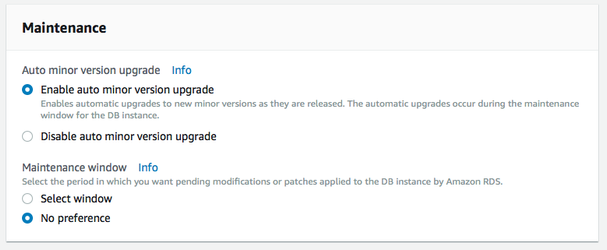
Ensure that the instance is launched and ready (takes a few minutes) and securely connect to RDS instance.
Code Block /opt/packagecloud/embedded/mysqlclient/bin/mysql --ssl-mode=VERIFY_IDENTITY --ssl-ca=/var/opt/packagecloud/packagecloud-rails/etc/rds-ca.pem -h packagecloud.xxxxxxx.us-east-1.rds.amazonaws.com -p -u awsReplacing packagecloud.xxxxxxx.us-east-1.rds.amazonaws.com with your RDS hostname and region.
Create an 'external' user with a with a long, preferably randomly generated password.
Code Block mysql> CREATE USER 'external'@'%' IDENTIFIED BY 'xxxxxxxx';Grant permissions and enforce SSL for 'external' user.
Code Block mysql> GRANT ALL PRIVILEGES ON packages_onpremise.* TO 'external'@'%' REQUIRE SSL;Flush privileges to save user/permission settings and disconnect.
Code Block mysql> FLUSH PRIVILEGES;Run the bootstrap-database command pointed at your RDS instance using the 'external' user and the password created above.
Code Block sudo packagecloud-ctl bootstrap-database -e -h packagecloud.xxxxxxx.us-east-1.rds.amazonaws.com -u external -p xxxxxxxx --rds-ssl
Securely expose source instance MySQL to DMS
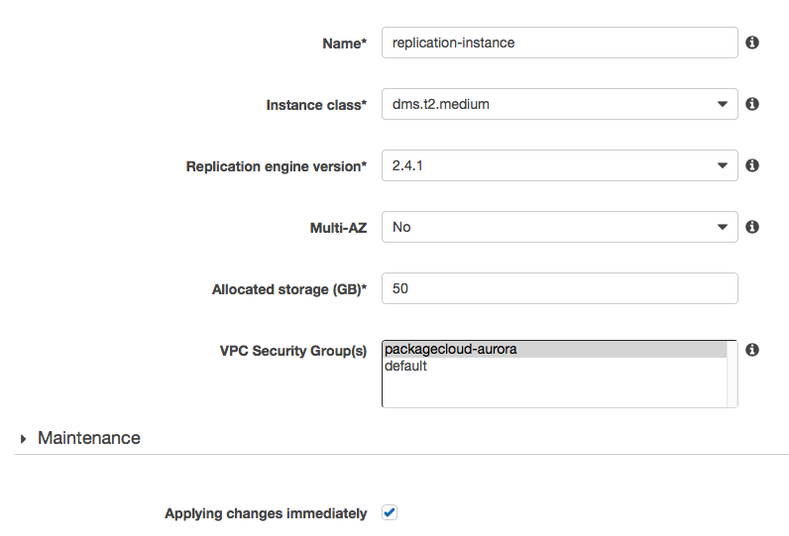
- Under 'Replication Instances' in DMS, create a replication instance in the same VPC as your RDS instance. Note: The instance size will determine how quickly data can be moved off from your Source Instance to your Target Instance. If you find your migration is going too slowly, you might need to start over with a larger Replication Instance. More details on how to size your replication instance can be found here: https://docs.aws.amazon.com/dms/latest/userguide/CHAP_BestPractices.html#CHAP_BestPractices.SizingReplicationInstance
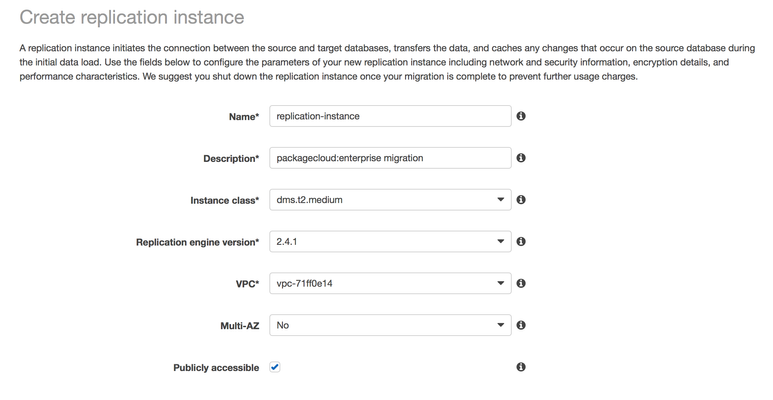
Under 'Advanced', make sure you choose the security group we created earlier:
Transfer the MySQL CA certificate from your packagecloud:enterprise instance to your local computer (This is generated automatically for you since version 2.0.2-1 of packagecloud:enterprise).
Code Block scp user@my-packagecloud-instance:/var/opt/packagecloud/lib/mysql/ca.pem .- Under 'Certificates' Section in DMS click 'Import Certificate' to import that certificate.

Give the certificate a name and upload it from your local computer to Amazon DMS.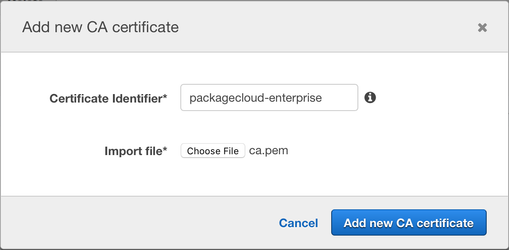
Go back to 'Replication Instances' and take note of the provisioned instance's IP to create a firewall rule to only allow this IP to talk to our MySQL server, in our example our Replication Instance has the IP of 40.40.40.40 and our local MySQL is configured to use port 3306 (the default for packagecloud:enterprise).
Code Block sudo iptables -A INPUT -p tcp -s 40.40.40.40/32 --dport 3306 -m conntrack --ctstate NEW,ESTABLISHED -j ACCEPTWe'll need to allow outgoing traffic on that port as well.
Code Block sudo iptables -A OUTPUT -p tcp --sport 3306 -m conntrack --ctstate ESTABLISHED -j ACCEPTEdit /etc/packagecloud/packagecloud.rb and make sure the following values are present/uncommented out.
Code Block mysql['ssl_enabled'] = true mysql['bind_address'] = "0.0.0.0" mysql['port'] = 3306Connect to source instance MySQL.
Code Block /opt/packagecloud/embedded/mysqlclient/bin/mysql -S /var/opt/packagecloud/lib/mysql/mysql.socketCreate an 'aws' user that DMS will use to securely talk to source instance with a long, preferably randomly generated password.
Code Block mysql> CREATE USER 'aws'@'%' IDENTIFIED BY 'xxxxxxx'; mysql> GRANT ALL PRIVILEGES ON *.* TO 'aws'@'%' REQUIRE SSL; mysql> FLUSH PRIVILEGES;Reconfigure and Restart.
Code Block sudo packagecloud-ctl reconfigure sudo packagecloud-ctl restart- Source instance MySQL should now be securely listening on 0.0.0.0:3306.
Initiate Transfer and Replication on DMS
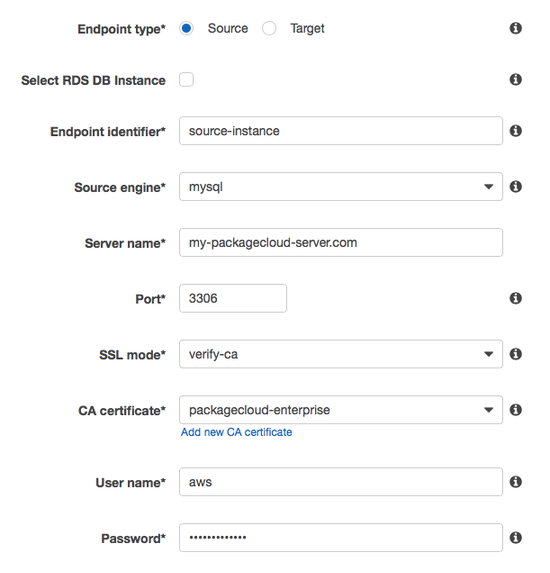
- In DMS, under 'Endpoints', click 'Create Endpoint'.

- Enter Source Instance details, making sure to use the certificate uploaded above with SSL mode 'verify-ca'.
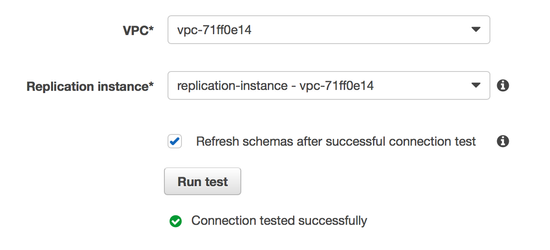
- Scroll to the bottom and you should see a 'Test endpoint connection' section, choose the VPC and replication instance you just created and click 'Run Test', if you don't see 'Connection tested successfully', make sure the username, password and certificate are all correct.
- Click 'Create Endpoint' again to create our target endpoint, using the password for RDS we created above. Note: SSL mode can be safely set to 'none' because the Replication Instance and the Target Instance are in the same VPC.
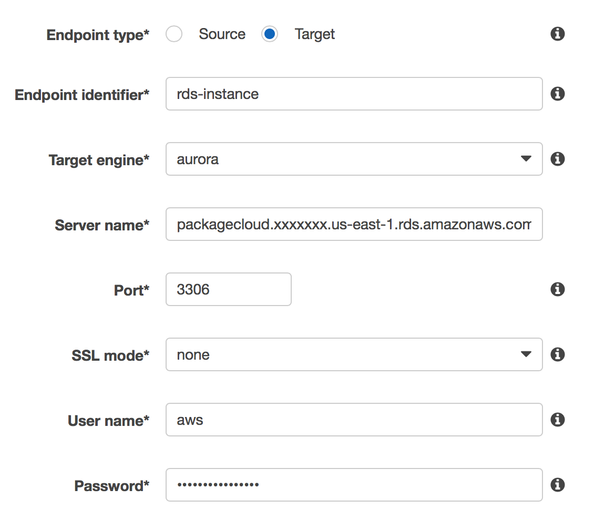
- Again, scroll down to where it says 'Test endpoint connection' and make sure the replication instance can connect to the endpoint successfully before continuing.
If everything went well, you should now see 2 endpoints with status of 'active'.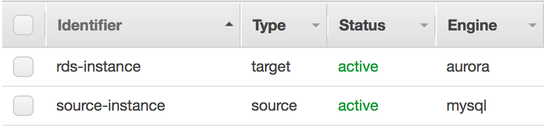
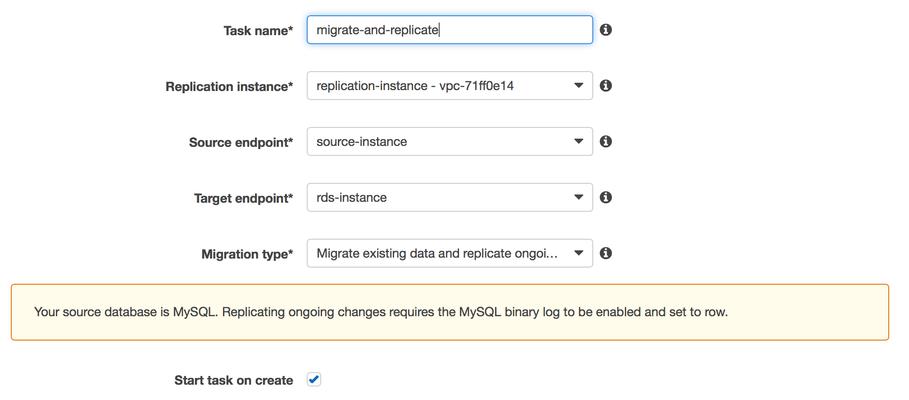
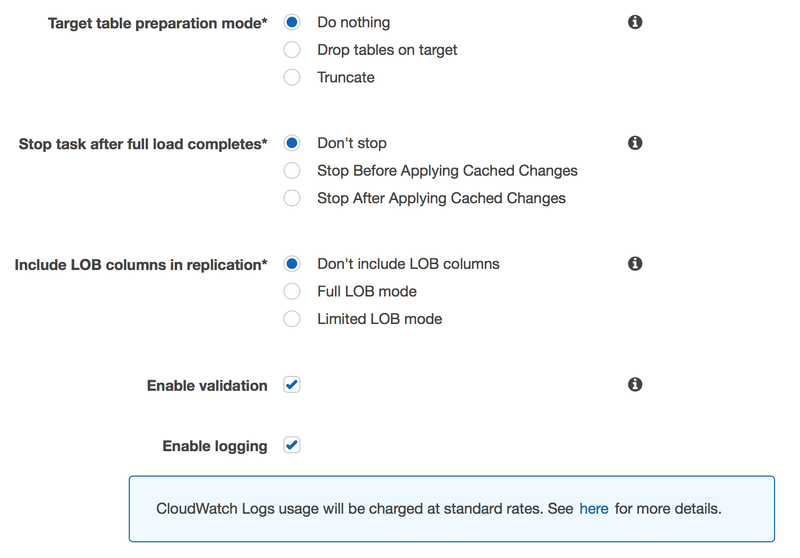
- Under the 'Tasks' section of DMS, click 'Create Task' with the following settings.

Under 'Table Mappings', switch to the 'JSON' tab, check the 'Enable JSON editing' and paste the following rules into the text area. Note: Make sure you replace the entire contents with the following.
Code Block { "rules": [ { "rule-type": "selection", "rule-id": "1", "rule-name": "1", "object-locator": { "schema-name": "packages_onpremise", "table-name": "%" }, "rule-action": "include" }, { "rule-type": "selection", "rule-id": "2", "rule-name": "2", "object-locator": { "schema-name": "mysql", "table-name": "%" }, "rule-action": "exclude" }, { "rule-type": "selection", "rule-id": "3", "rule-name": "3", "object-locator": { "schema-name": "performance_schema", "table-name": "%" }, "rule-action": "exclude" }, { "rule-type": "selection", "rule-id": "4", "rule-name": "4", "object-locator": { "schema-name": "information_schema", "table-name": "%" }, "rule-action": "exclude" }, { "rule-type": "selection", "rule-id": "5", "rule-name": "5", "object-locator": { "schema-name": "test", "table-name": "%" }, "rule-action": "exclude" }, { "rule-type": "selection", "rule-id": "6", "rule-name": "6", "object-locator": { "schema-name": "packages_onpremise", "table-name": "ar_internal_metadata" }, "rule-action": "exclude" } ] }- Now you can click 'Create Task' to create the task and start the migration.
Monitor migration progress
Once the task has started, it will first do a full load of all your data, then replicate any changes that happened since the full load. Depending on the total size of your data set, the rate/amount of incoming changes, and the size of the replication instance, this task might take several minutes to several days to complete. This section will show you how you can view the progress of your task. More details are available here: https://docs.aws.amazon.com/dms/latest/userguide/CHAP_Monitoring.html
| Info |
|---|
To speed up the migration and validation task, it is recommended that you keep writes to your Source Instance to a minimum after the task has started. |
Table statistics
Clicking on the 'Table Statistics' tab shows the status of each table. To refresh this information, you'll have to periodically click the refresh symbol icon on the top right. Note: This refresh button is separate from the task refresh button at the top of the main Tasks page.

The 'Table Statistics' tab looks like this:

A 'Validation State' of 'Validated' means thats all of that table's data has been migrated and verified to be correct on both sides.
A 'Validation State' of 'Pending Records' means that there are still records to transfer and validate. For example:

Then after a few moments, we can see that it's finally done with a state of 'Validated'

Task monitoring
We can also use the 'Task monitoring' tab to view metrics/graphs associated with our migration:
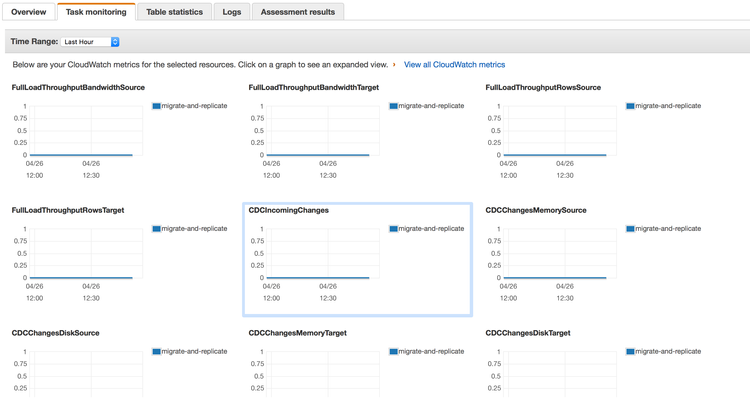
| Note |
|---|
You can click on a particular metric to view it in detail and get the latest results. |
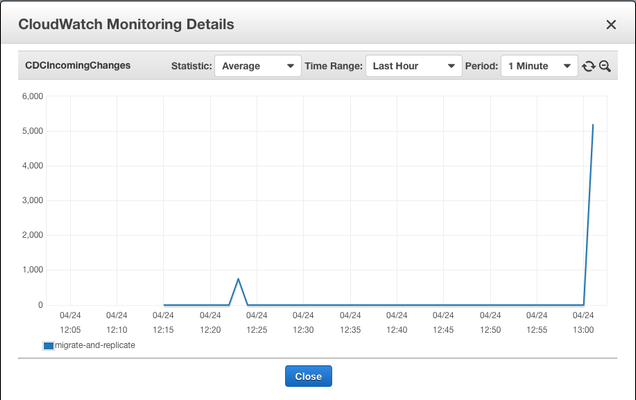
Of particular importance is the 'CDCIncomingChanges' metric. This is how many records are left to be replicated to the Target Instance. This is an example of a spike of created rows waiting to be replicated:
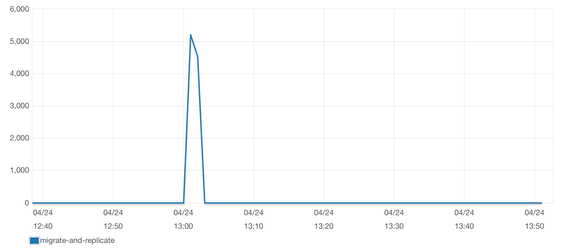
Which we can see fall to zero after it finishes replicating those rows:
Switch Configuration to use target instance on RDS
| Warning |
|---|
Ensure that all tables have a 'Validation State' of 'Validated' and 'CDCIncomingChanges' is at 0 before proceeding! |
Before we switch over, let's ensure that any last minute remaining changes are sent over. Shut down all of packagecloud:enterprise services (except the database):
No Format packagecloud-ctl stop nginx packagecloud-ctl stop unicorn packagecloud-ctl stop rainbows packagecloud-ctl stop resque- Wait a few moments and keep refreshing 'Table Statistics' and 'Task monitoring' until all tables have a 'Validation State' of 'Validated' and CDCIncomingChanges is at 0 again. This might be immediate if there were no changes left to replicate.
Edit '/etc/packagecloud/packagecloud.rb' and make the following changes:
No Format packagecloud_rails['database_host'] = 'packagecloud.xxxxxxxxxxxx.us-east-1.rds.amazonaws.com' packagecloud_rails['database_user'] = 'external' packagecloud_rails['database_password'] = 'xxxxxxxx' packagecloud_rails['database_port'] = 3306 packagecloud_rails['database_name'] = 'packages_onpremise' packagecloud_rails['database_ssl'] = true packagecloud_rails['rds_ssl'] = trueComment out, or delete the following lines:
No Format #mysql['ssl_enabled'] = true #mysql['bind_address'] = "0.0.0.0" #mysql['port'] = 3306- Navigate back to DMS 'Tasks' section and click 'Stop' on the migration task we created.
Then reconfigure and restart:
No Format packagecloud-ctl reconfigure packagecloud-ctl restart- Your packagecloud:enterprise instance should now be talking to your Target Instance!
Cleanup
- Navigate back to the DMS 'Tasks' section and delete the task we created
- Navigate back to the DMS 'Replication instances' section and destroy the replication instance to avoid any unnecessary charges.
Remove the firewall rule we created earlier to allow our replication instance to communicate with our source instance
(replace 40.40.40.40/32 with your replication instance IP, you can also use iptables -S to find this IP):No Format sudo iptables -D INPUT -p tcp -s 40.40.40.40/32 --dport 3306 -m conntrack --ctstate NEW,ESTABLISHED -j ACCEPT
Troubleshooting
Task appears to be stuck, not working
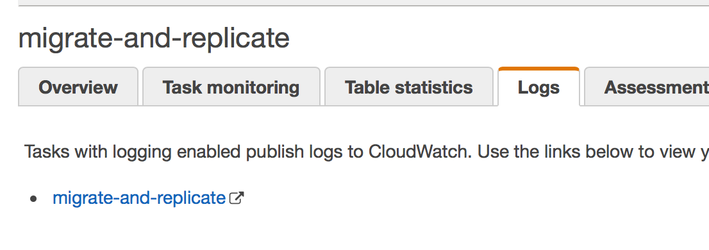
You can view logs by going to the 'Logs' tab for under 'Tasks' in DMS